
Part 10 - 分割叶子节点
我们的 B 树并不像只有一个节点的树。 要解决此问题, 我们需要一些代码把一个叶子节点一分为二。 然后, 我们需要创建一个内部节点作为两个叶子节点的父节点。
基本上, 本文的目标是从此出发:
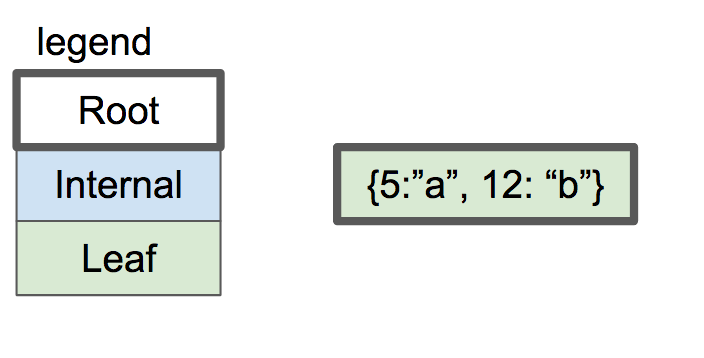
one-node btree
到此:
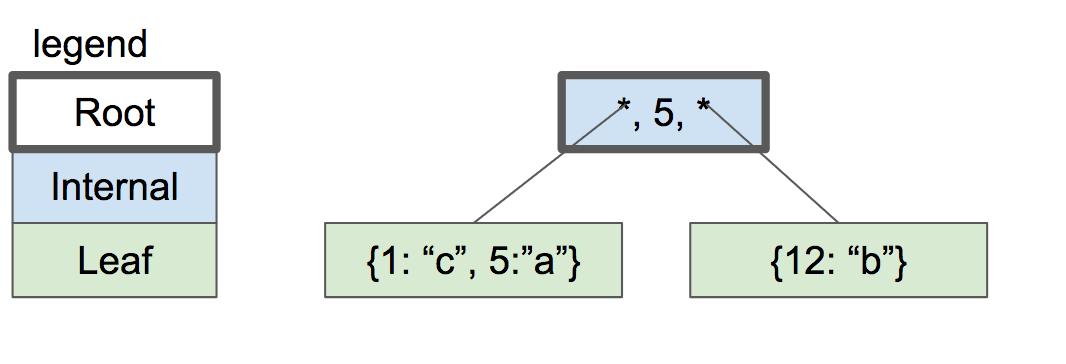
two-level btree
首先, 让我们删除完整叶节点的错误处理:
void leaf_node_insert(Cursor* cursor, uint32_t key, Row* value)
{
    void* node = get_page(cursor->table->pager, cursor->page_num);
    uint32_t num_cells = *leaf_node_num_cells(node);
    if (num_cells >= LEAF_NODE_MAX_CELLS)
    {
        // Node full
        leaf_node_split_and_insert(cursor, key, value);
        return;
    }
    if (cursor->cell_num < num_cells)
    {
        // Make room for new cell
        for (uint32_t i = num_cells; i > cursor->cell_num; i--)
        {
            memcpy(leaf_node_cell(node, i), leaf_node_cell(node, i - 1),LEAF_NODE_CELL_SIZE);
        }
    }
    *(leaf_node_num_cells(node)) += 1;
    *(leaf_node_key(node, cursor->cell_num)) = key;
    serialize_row(value, leaf_node_value(node, cursor->cell_num));
}

ExecuteResult execute_insert(Statement* statement, Table* table)
{
    void* node = get_page(table->pager, table->root_page_num);
    uint32_t num_cells = (*leaf_node_num_cells(node));

    Row* row_to_insert = &(statement->row_to_insert);
    uint32_t key_to_insert = row_to_insert->id;
    Cursor* cursor = table_find(table, key_to_insert);

    if (cursor->cell_num < num_cells)
    {
        uint32_t key_at_index = *leaf_node_key(node, cursor->cell_num);
        if (key_at_index == key_to_insert)
        {
            return EXECUTE_DUPLICATE_KEY;
        }
    }

    leaf_node_insert(cursor, row_to_insert->id, row_to_insert);
    free(cursor);
    return EXECUTE_SUCCESS;
}
10.1 分割算法
简单的部分结束了。 这是我们需要从 《 SQLite 数据库系统执行的操作的描述 : 设计和实现 》
If there is no space on the leaf node, we would split the existing entries residing there and the new one (being inserted) into two equal halves: lower and upper halves. (Keys on the upper half are strictly greater than those on the lower half.) We allocate a new leaf node, and move the upper half into the new node.
让我们获取旧节点的句柄并创建新节点:
[void leaf_node_split_and_insert(Cursor* cursor, uint32_t key, Row* value)]
/*
 * Create a new node and move half the cells over.
 * Insert the new value in one of the two nodes.
 * Update parent or create a new parent.
 */

void *old_node = get_page(cursor->table->pager, cursor->page_num);
uint32_t new_page_num = get_unused_page_num(cursor->table->pager);
void *new_node = get_page(cursor->table->pager, new_page_num);
initialize_leaf_node(new_node);
接下来, 将每个单元格复制到新位置:
[void leaf_node_split_and_insert(Cursor* cursor, uint32_t key, Row* value)]
/*
 * All existing keys plus new key should be divided
 * evenly between old (left) and new (right) nodes.
 * Starting from the right, move each key to correct position.
 */
for (int32_t i = LEAF_NODE_MAX_CELLS; i >= 0; i--)
{
    void *destination_node;
    if (i >= LEAF_NODE_LEFT_SPLIT_COUNT)
    {
        destination_node = new_node;
    } else {
        destination_node = old_node;
    }
    uint32_t index_within_node = i % LEAF_NODE_LEFT_SPLIT_COUNT;
    void *destination = leaf_node_cell(destination_node, index_within_node);

    if (i == cursor->cell_num)
    {
        serialize_row(value, destination);
    } else if (i > cursor->cell_num)
    {
        memcpy(destination, leaf_node_cell(old_node, i - 1), LEAF_NODE_CELL_SIZE);
    } else {
        memcpy(destination, leaf_node_cell(old_node, i), LEAF_NODE_CELL_SIZE);
    }
}
更新每个节点 header 中的单元格计数:
[void leaf_node_split_and_insert(Cursor* cursor, uint32_t key, Row* value)]
/* Update cell count on both leaf nodes */
*(leaf_node_num_cells(old_node)) = LEAF_NODE_LEFT_SPLIT_COUNT;
*(leaf_node_num_cells(new_node)) = LEAF_NODE_RIGHT_SPLIT_COUNT;
然后我们需要更新节点的父节点。 如果原始节点是根节点, 则它没有父节点。 在这种情况下, 请创建一个新的根节点以充当父节点。 我现在暂存另一个分支:
if (is_node_root(old_node))
{
    return create_new_root(cursor->table, new_page_num);
} else {
    printf("Need to implement updating parent after split\n");
    exit(EXIT_FAILURE);
}
10.2 分配新页面
让我们回过头来定义一些新的函数和常量。 创建新的叶子节点时, 将其放入由 get_unused_page_num() 确定的页面中:
/*
* Until we start recycling free pages, new pages will always
* go onto the end of the database file
*/
uint32_t get_unused_page_num(Pager* pager)
{
    return pager->num_pages;
}
现在我们假设在具有 N 页的数据库中, 分配了页码 0 到 N-1。 因此我们始终可以为新页面分配页码 N。 最终在我们实现删除操作后, 某些页面可能会变空并且其页码未使用。 为了提高效率, 我们可以重新分配那些空闲页面。
10.3 叶节点大小
为了使树保持平衡, 我们在两个新节点之间平均分配了单元。 如果叶节点可以容纳 N 个单元, 则在拆分期间, 我们需要在两个节点之间分配 N + 1 个单元 (N 个原始单元加一个新单元)。 如果 N + 1 为奇数, 我将任意选择左侧节点以得到一个单元格。
const uint32_t LEAF_NODE_RIGHT_SPLIT_COUNT = (LEAF_NODE_MAX_CELLS + 1) / 2;
const uint32_t LEAF_NODE_LEFT_SPLIT_COUNT = (LEAF_NODE_MAX_CELLS + 1) - LEAF_NODE_RIGHT_SPLIT_COUNT;
10.4 创建一个新的根节点
以下是 SQLite 数据库系统 如何解释创建新根节点的过程:
令 N 为根节点。 首先分配两个节点, 例如 L 和 R。 将 N 的下半部分移至 L, 将上半部分移至 R。 现在 N 为空。 在 N 中添加 <L,K,R>, 其中 K 是 L 中的最大键。 第 N 页仍然是根。 请注意, 树的深度增加了 1, 但是新树保持了高度平衡, 而没有违反任何 B+ tree 属性。
至此我们已经分配了合适的子节点并将上半部分移入其中。 我们的函数将右边的子节点作为输入, 并分配一个新页面来存储左边的子节点。
[create_new_root(Table* table, uint32_t right_child_page_num)]
/*
 * Handle splitting the root.
 * Old root copied to new page, becomes left child.
 * Address of right child passed in.
 * Re-initialize root page to contain the new root node.
 * New root node points to two children.
 */

void* root = get_page(table->pager, table->root_page_num);
void* right_child = get_page(table->pager, right_child_page_num);
uint32_t left_child_page_num = get_unused_page_num(table->pager);
void* left_child = get_page(table->pager, left_child_page_num);
旧的根节点将复制到左子节点, 因此我们可以重用根节点页:
[create_new_root(Table* table, uint32_t right_child_page_num)]
/* Left child has data copied from old root */
memcpy(left_child, root, PAGE_SIZE);
set_node_root(left_child, false);
最后, 我们将根页面初始化为具有两个子节点的新内部节点。
[create_new_root(Table* table, uint32_t right_child_page_num)]
/* Root node is a new internal node with one key and two children */
initialize_internal_node(root);
set_node_root(root, true);
*internal_node_num_keys(root) = 1;
*internal_node_child(root, 0) = left_child_page_num;
uint32_t left_child_max_key = get_node_max_key(left_child);
*internal_node_key(root, 0) = left_child_max_key;
*internal_node_right_child(root) = right_child_page_num;
10.5 内部节点格式
现在我们终于创建了一个内部节点, 我们必须定义它的布局。 它从公共 header 开始, 然后是它所包含的键的数量, 然后是它最右边的子节点的页码。 内部节点总是比它们的键多一个子节点指针。 这个额外的子节点指针被存储在 header 中。
/*
* Internal Node Header Layout
*/
const uint32_t INTERNAL_NODE_NUM_KEYS_SIZE = sizeof(uint32_t);
const uint32_t INTERNAL_NODE_NUM_KEYS_OFFSET = COMMON_NODE_HEADER_SIZE;
const uint32_t INTERNAL_NODE_RIGHT_CHILD_SIZE = sizeof(uint32_t);
const uint32_t INTERNAL_NODE_RIGHT_CHILD_OFFSET =
        INTERNAL_NODE_NUM_KEYS_OFFSET + INTERNAL_NODE_NUM_KEYS_SIZE;
const uint32_t INTERNAL_NODE_HEADER_SIZE = COMMON_NODE_HEADER_SIZE +
        INTERNAL_NODE_NUM_KEYS_SIZE +
        INTERNAL_NODE_RIGHT_CHILD_SIZE;
主体是一个单元格数组, 其中每个单元格都包含一个子节点指针和一个键。 每个键应该是子级左侧包含的最大键。
/*
* Internal Node Body Layout
*/
const uint32_t INTERNAL_NODE_KEY_SIZE = sizeof(uint32_t);
const uint32_t INTERNAL_NODE_CHILD_SIZE = sizeof(uint32_t);
const uint32_t INTERNAL_NODE_CELL_SIZE =
        INTERNAL_NODE_CHILD_SIZE + INTERNAL_NODE_KEY_SIZE;
根据这些常数, 以下是内部节点的布局:
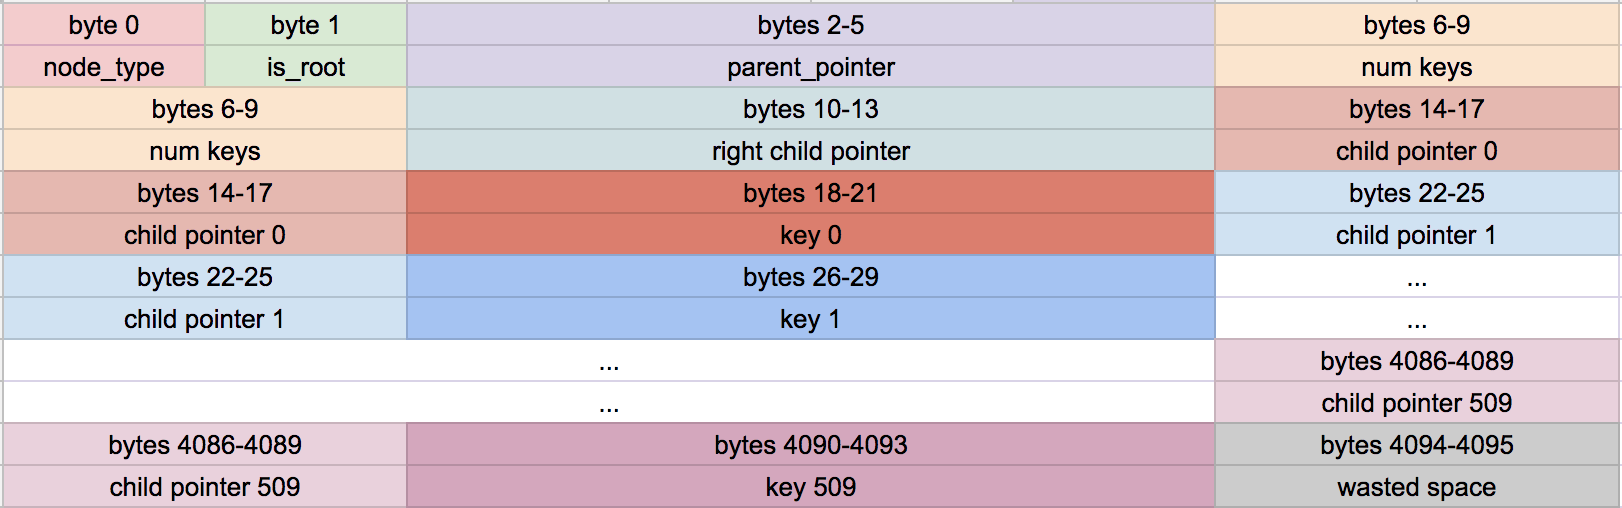
Our internal node format
注意我们巨大的分支因子。 由于每个子节点指针 / 键对都非常小, 因此我们可以在每个内部节点中容纳 510 个键和 511 个子指针。 这意味着我们将不必遍历树的许多层来找到给定的键!
# internal node layers |
max # leaf nodes |
Size of all leaf nodes |
|---|---|---|
0 |
511^0 = 1 |
4 KB |
1 |
511^1 = 512 |
-2 MB |
2 |
511^2 = 261,121 |
-1 GB |
3 |
511^3 = 133,432,831 |
-550 GB |
实际上由于头部 、 键和浪费的空间的开销, 我们不能在每个叶子节点上存储整整 4KB 的数据。 但是我们可以通过从磁盘加载 4 个页面来搜索大约 500GB 的数据。 这就是为什么 B 树是数据库的一个有用的数据结构。
下面是对内部节点进行读写的方法:
uint32_t* internal_node_num_keys(void* node)
{
    return node + INTERNAL_NODE_NUM_KEYS_OFFSET;
}

uint32_t* internal_node_right_child(void* node)
{
    return node + INTERNAL_NODE_RIGHT_CHILD_OFFSET;
}

uint32_t* internal_node_cell(void* node, uint32_t cell_num)
{
    return node + INTERNAL_NODE_HEADER_SIZE + cell_num * INTERNAL_NODE_CELL_SIZE;
}

uint32_t* internal_node_child(void* node, uint32_t child_num)
{
    uint32_t num_keys = *internal_node_num_keys(node);
    if (child_num > num_keys)
    {
        printf("Tried to access child_num %d > num_keys %d\n", child_num, num_keys);
        exit(EXIT_FAILURE);
    } else if (child_num == num_keys)
    {
        return internal_node_right_child(node);
    } else {
        return internal_node_cell(node, child_num);
    }
}

uint32_t* internal_node_key(void* node, uint32_t key_num)
{
    return internal_node_cell(node, key_num) + INTERNAL_NODE_CHILD_SIZE;
}
10.5 内部节点格式
对于内部节点, 最大键始终是其右键。 对于叶节点, 这是最大索引处的关键:
uint32_t get_node_max_key(void* node) {
    switch (get_node_type(node))
    {
        case NODE_INTERNAL:
            return *internal_node_key(node, *internal_node_num_keys(node) - 1);
        case NODE_LEAF:
            return *leaf_node_key(node, *leaf_node_num_cells(node) - 1);
    }
}
10.6 追踪根源
我们最后使用普通节点头中的 is_root 字段。 回顾一下, 我们用它来决定如何分割一个叶子节点:
[leaf_node_split_and_insert(Cursor* cursor, uint32_t key, Row* value)]
if (is_node_root(old_node))
{
    return create_new_root(cursor->table, new_page_num);
} else {
    printf("Need to implement updating parent after split\n");
    exit(EXIT_FAILURE);
}
这是 getter 和 setter:
bool is_node_root(void* node)
{
    uint8_t value = *((uint8_t*)(node + IS_ROOT_OFFSET));
    return (bool)value;
}

void set_node_root(void* node, bool is_root)
{
    uint8_t value = is_root;
    *((uint8_t*)(node + IS_ROOT_OFFSET)) = value;
}
初始化这两种类型的节点是应该默认将 is_root 设置为 false:
void initialize_leaf_node(void* node)
{
    set_node_type(node, NODE_LEAF);
    set_node_root(node, false);
    *leaf_node_num_cells(node) = 0;
}

void initialize_internal_node(void* node)
{
    set_node_type(node, NODE_INTERNAL);
    set_node_root(node, false);
    *internal_node_num_keys(node) = 0;
}
我们应该在创建表的第一个节点时将 is_root 设置为 true:
Table* db_open(const char* filename)
{
    Pager* pager = pager_open(filename);

    Table* table = malloc(sizeof(Table));
    table->pager = pager;
    table->root_page_num = 0;

    if (pager->num_pages == 0)
    {
        // New database file. Initialize page 0 as leaf node.
        void* root_node = get_page(pager, 0);
        initialize_leaf_node(root_node);
        set_node_root(root_node, true);
    }

    return table;
}
10.7 打印树
为了帮助我们可视化数据库的状态, 我们应该更新 .btree 元指令以打印多级树。
我将替换当前的 print_leaf_node() 函数。
一个新的递归函数, 该函数接受任何节点, 然后打印该节点及其子节点。 它以缩进级别作为参数, 每次递归调用时都会增加。 我还添加了一个小的辅助函数来缩进。
void indent(uint32_t level)
{
    for (uint32_t i = 0; i < level; i++)
    {
        printf("  ");
    }
}

void print_tree(Pager* pager, uint32_t page_num, uint32_t indentation_level)
{
    void* node = get_page(pager, page_num);
    uint32_t num_keys, child;

    switch (get_node_type(node))
    {
        case (NODE_LEAF):
            num_keys = *leaf_node_num_cells(node);
            indent(indentation_level);
            printf("- leaf (size %d)\n", num_keys);
            for (uint32_t i = 0; i < num_keys; i++)
            {
                indent(indentation_level + 1);
                printf("- %d\n", *leaf_node_key(node, i));
            }
            break;
        case (NODE_INTERNAL):
            num_keys = *internal_node_num_keys(node);
            indent(indentation_level);
            printf("- internal (size %d)\n", num_keys);
            for (uint32_t i = 0; i < num_keys; i++)
            {
                child = *internal_node_child(node, i);
                print_tree(pager, child, indentation_level + 1);

                indent(indentation_level + 1);
                printf("- key %d\n", *internal_node_key(node, i));
            }
            child = *internal_node_right_child(node);
            print_tree(pager, child, indentation_level + 1);
            break;
    }
}
并更新对打印函数的调用, 缩进级别为零。
else if(strcmp(input_buffer->buffer, ".btree") == 0){
        printf("Tree:\n");
        print_tree(table->pager, 0, 0);
        return META_COMMAND_SUCCESS;
    }
这是新打印功能的测试用例!
it 'allows printing out the structure of a 3-leaf-node btree' do
    script = (1..14).map do |i|
    "insert #{i} user#{i} person#{i}@example.com"
    end
    script << ".btree"
    script << "insert 15 user15 person15@example.com"
    script << ".exit"
    result = run_script(script)

    expect(result[14...(result.length)]).to match_array([
    "db > Tree:",
    "- internal (size 1)",
    "  - leaf (size 7)",
    "    - 1",
    "    - 2",
    "    - 3",
    "    - 4",
    "    - 5",
    "    - 6",
    "    - 7",
    "  - key 7",
    "  - leaf (size 7)",
    "    - 8",
    "    - 9",
    "    - 10",
    "    - 11",
    "    - 12",
    "    - 13",
    "    - 14",
    "db > Need to implement searching an internal node",
    ])
end
新格式有所简化, 因此我们需要更新现有的 .btree 测试:
it 'allows printing out the structure of a one-node btree' do
    script = [3, 1, 2].map do |i|
    "insert #{i} user#{i} person#{i}@example.com"
    end
    script << ".btree"
    script << ".exit"
    result = run_script(script)

    expect(result).to match_array([
    "db > Executed.",
    "db > Executed.",
    "db > Executed.",
    "db > Tree:",
    "- leaf (size 3)",
    "  - 1",
    "  - 2",
    "  - 3",
    "db > "
    ])
end
这是新测试本身的 .btree 输出:
Tree:
- internal (size 1)
    - leaf (size 7)
        - 1
        - 2
        - 3
        - 4
        - 5
        - 6
        - 7
    - key 7
    - leaf (size 7)
        - 8
        - 9
        - 10
        - 11
        - 12
        - 13
        - 14
在最小缩进级别上, 我们看到根节点 (内部节点)。 之所以说是 1 号, 是因为它有一个 key。 缩进一个级别, 我们看到一个叶节点, 一个键和另一个叶节点。 根节点 (7) 中的密钥是第一个叶节点中的最大密钥。 每个大于 7 的键都在第二个叶子节点中。
10.8 严重问题
如果你一直在密切关注, 你可能会发现我们错过了一些重要的东西。 看看如果我们尝试插入一个额外的行会发生什么:
db > insert 15 user15 person15@example.com
Need to implement searching an internal node
哎呀! 谁写了那个 TODO 消息? :P
接下来, 我们将通过在多级树上执行搜索来继续史诗般的 B 树传奇。
这里[8] 是本节代码所有的改动。