
Python Web 模块之 Flask v0.1
第 2 部分 源码阅读准备
2.3 Flask 工作流程与机制
2.3.1 Flask 中的请求相应循环
2.3.1.1 程序启动
class Flask(object):
    def run(self, host='localhost', port=5000, **options):
        from werkzeug import run_simple
        if 'debug' in options:
            self.debug = options.pop('debug')
        options.setdefault('use_reloader', self.debug)
        options.setdefault('use_debugger', self.debug)
        return run_simple(host, port, self, **options)    # run_simple

[werkzeug/serving.py]

def run_simple(hostname, port, application, use_reloader=False,
            use_debugger=False, use_evalex=True,
            extra_files=None, reloader_interval=1, threaded=False,
            processes=1, request_handler=None, static_files=None,
            passthrough_errors=False, ssl_context=None):
    if use_debugger: # 判断是否使用调试器
        from werkzeug.debug import DebuggedApplication
        application = DebuggedApplication(application, use_evalex)
    if static_files:
        from werkzeug.wsgi import SharedDataMiddleware
        application = SharedDataMiddleware(application, static_files)

    def inner():
        make_server(hostname, port, application, threaded,
                    processes, request_handler,
                    passthrough_errors, ssl_context).serve_forever()

    if os.environ.get('WERKZEUG_RUN_MAIN') != 'true':
        display_hostname = hostname != '*' and hostname or 'localhost'
        if ':' in display_hostname:
            display_hostname = '[%s]' % display_hostname
        _log('info', ' * Running on %s://%s:%d/', ssl_context is None
            and 'http' or 'https', display_hostname, port)
    if use_reloader: # 判断是否使用重载器
        # Create and destroy a socket so that any exceptions are raised before
        # we spawn a separate Python interpreter and lose this ability.
        test_socket = socket.socket(socket.AF_INET, socket.SOCK_STREAM)
        test_socket.setsockopt(socket.SOL_SOCKET, socket.SO_REUSEADDR, 1)
        test_socket.bind((hostname, port))
        test_socket.close()
        run_with_reloader(inner, extra_files, reloader_interval)
    else:
        inner()
run() 函数最后一行是 return run_simple(host, port, self, **options) , 而 run_simple() 函数的第三个参数是 application , 实际使用的时候是 self , 指的是 Flask 对象本身 , 因此会调用当前对象的 __call__() 方法进行请求的处理 , 这时就会运行 wsgi_app 。
在这里使用了两个 Werkzeug 提供的中间件 , 如果 use_debugger 为 Ture , 也就是开启调试模式 , 那么就使用 DebuggedApplication 中间件为程序添加调试功能 。 如果 static_files 为 True , 就使用 SharedDataMiddleware 中间件为程序添加提供 (serve) 静态文件的功能 。
这个方法最终会调用 inner() 函数 , 函数中的代码和之前创建的 WSGI 程序末尾很像 。 它使用 make_server() 方法创建服务器 , 然后调用 serve_forever() 方法运行服务器 。 为了避免偏离重点 , 中间在 Werkzeug 和其他模块的调用我们不再分析 。 我们在前面学习过 WSGI 的内容 , 当接收到请求时 , WSGI 服务器会调用 Web 程序中提供的可调用对象 , 这个对象就是我们的程序实例 app 。 现在 , 第一个请求进入了 。
2.3.1.2 请求 In
Flask类实现了 __call__() 方法 , 当程序实例被调用时会执行这个方法 , 而这个方法内部调用了 Flask.wsgi_app() 方法 , 如下所示 。
[flask.py]

class Flask(object):

    def wsgi_app(self, environ, start_response):
        with self.request_context(environ):
            rv = self.preprocess_request()
            if rv is None:
                rv = self.dispatch_request()
            response = self.make_response(rv)
            response = self.process_response(response)
            return response(environ, start_response)

    def __call__(self, environ, start_response):
        """Shortcut for :attr:`wsgi_app`"""
        return self.wsgi_app(environ, start_response)
通过 wsgi_app() 方法接收的参数可以看出来 , 这个 wsgi_app() 方法就是隐藏在 Flask 中的那个 WSGI 程序 。 这里将 WSGI 程序实现在单独的方法中 , 而不是直接实现在 __call__() 方法中 , 主要是为了在方便附加中间件的同时保留对程序实例的引用 。 WSGI 程序调用了 preprocess_request() 方法对请求进行预处理 (request preprocessing) , 这会执行所有使用 before_request 钩子注册的函数 。
如果预处理没有结果 , 即为空 , 然后执行 dispatch_request , 用于请求调度 , 它会匹配并调用对应的视图函数 , 获取其返回值 , 在这里赋值给rv 。 请求调度的具体细节我们会在后面了解 。 最后 , 接收视图函数返回值的 make_response 会使用这个值来生成响应 。 完整的调度在 wsgi_app 中已经写明了 。
2.3.1.3 响应 Out
而最终的处理也是在 wsgi_app 中 , 如下 :
def wsgi_app(self, environ, start_response):
    with self.request_context(environ):
        rv = self.preprocess_request()
        if rv is None:
            rv = self.dispatch_request()
        response = self.make_response(rv)
        response = self.process_response(response)
        return response(environ, start_response)
在函数的最后三行 , 使用 Flask 类中的 make_response() 方法生成响应对象 , 然后调用 process_response() 方法处理响应 。 返回作为响应的 response 后 , 代码执行流程就回到了 wsgi_app() 方法 , 最后返回响应对象 , WSGI 服务器接收这个响应对象 , 并把它转换成 HTTP 响应报文发送给客户端 。 就这样 , Flask 中的请求 - 循环之旅结束了 。
2.3.2 路由系统
2.3.2.1 注册路由
路由系统内部是由 Werkzeug 实现的 , 为了更好地了解 Flask 中的相关代码 , 需要先看一下路由功能在 Werkzeug 中是如何实现的 。 下面的代码用于创建路由表 Map , 并添加三个 URL 规则 :
>>> from werkzeug.routing import Map, Rule
>>> m = Map()
>>> rule1 = Rule('/', endpoint='index')
>>> rule2 = Rule('/downloads/', endpoint='downloads/index')
>>> rule3 = Rule('/downloads/<int:id>', endpoint='downloads/show')
>>> m
Map([[]])
>>> m.add(rule1)
>>> m.add(rule2)
>>> m.add(rule3)
>>> m
Map([[<Rule '/' -> index>,
<Rule '/downloads/' -> downloads/index>,
<Rule '/downloads/<id>' -> downloads/show>]])
>>>
在 Flask 中 , 我们使用 route() 装饰器来将试图函数注册为路由 :
@app.route('/')
def hello():
    return 'Hello, Flask!'
Flask.route() 是 Flask 类的类方法 , 如代码清单所示 。
[flask.py]

class Flask(object):

    def route(self, rule, **options):
        def decorator(f):
            self.add_url_rule(rule, f.__name__, **options)
            self.view_functions[f.__name__] = f
            return f
        return decorator
可以看到 route 装饰器的内部调用了 add_url_rule() 来添加 URL 规则 , 所以注册路由也可以直接使用 add_url_rule 实现 。 add_url_rule() 方法如代码清单所示 :
[flask.py]

class Flask(object):

    def add_url_rule(self, rule, endpoint, **options):
        options['endpoint'] = endpoint
        options.setdefault('methods', ('GET',))
        self.url_map.add(Rule(rule, **options))
这个方法的重点是 self.url_map.add(Rule(rule, **options)) , 这里引入了 url_map 。 而在 route 函数中则引入了 view_functions 对象 。
url_map 是 Werkzeug 的 Map 类实例 (werkzeug.routing.Map) 。 它存储了 URL 规则和相关配置 , 这里的 rule 是 Werkzeug 提供的 Rule 实例 (werkzeug.routing.Rule) , 其中保存了端点和 URL 规则的映射关系 。
而 view_function 则是 Flask 类中定义的一个字典 , 它存储了端点和视图函数的映射关系 。 看到这里你大概已经发现端点是如何作为中间人连接起 URL 规则和视图函数的 。 如果回过头看本节开始提供的 Werkzeug 中的路由注册代码 , 你会发现 add_url_rule() 方法中的这些代码做了同样的事情 :
[flask.py]
self.url_map.add(Rule(rule, **options))
2.3.2.2 URL 匹配
在上面的 Werkzeug 路由注册代码示例中 , 我们创建了路由表 m , 并使用 add() 方法添加了三个路由规则 。 现在 , 来看看如何在 Werkzeug 中进行 URL 匹配 , URL 匹配的示例如下所示 :
>>> from werkzeug.routing import Map, Rule
>>> m = Map()
>>> rule1 = Rule('/', endpoint='index')
>>> rule2 = Rule('/downloads/', endpoint='downloads/index')
>>> rule3 = Rule('/downloads/<int:id>', endpoint='downloads/show')
>>> m
Map([[]])
>>> m.add(rule1)
>>> m.add(rule2)
>>> m.add(rule3)
>>> m
Map([[<Rule '/' -> index>,
<Rule '/downloads/' -> downloads/index>,
<Rule '/downloads/<id>' -> downloads/show>]])
>>> urls = m.bind('example.com')
>>> urls.match('/', 'GET')
('index', {})
>>> urls.match('/downloads/42')
('downloads/show', {'id': 42})
>>> urls.match('/downloads')
Traceback (most recent call last):
File "<stdin>", line 1, in <module>
File "C:\Anaconda3\envs\python27\lib\site-packages\werkzeug\routing.py", line 1261, in match
    url_quote(path_info.lstrip('/'), self.map.charset)
werkzeug.routing.RequestRedirect: 301: Moved Permanently
>>> urls.match('/missing')
Traceback (most recent call last):
File "<stdin>", line 1, in <module>
File "C:\Anaconda3\envs\python27\lib\site-packages\werkzeug\routing.py", line 1302, in match
    raise NotFound()
werkzeug.exceptions.NotFound: 404: Not Found
>>>
Map.bind() 方法和 Map.bind_to_environ() 都会返回一个 MapAdapter 对象 , 它负责匹配和构建 URL 。 MapAdapter 类的 match 方法用来判断传入的 URL 是否匹配 Map 对象中存储的路由规则 (存储在 self.map._rules 列表中) 。 上面的例子中分别展示了几种常见的匹配情况 。 匹配成功后会返回一个包含 URL 端点和 URL 变量的元组 。
为了确保 URL 的唯一 , Werkzeug 使用下面的规则来处理尾部斜线问题 : 当你定义的 URL 规则添加了尾部斜线时 , 用户访问未加尾部斜线的 URL 时会被自动重定向到正确的 URL ; 反过来 , 如果定义的 URL 不包含尾部斜线 , 用户访问的 URL 添加了尾部斜线则会返回 404 错误 。 MapAdapter 类的 build() 方法用于创建 URL , 我们用来生成 URL 的 url_for() 函数内部就是通过 build() 方法实现的 。 下面是一个简单的例子 :
接着上文 :
>>> urls.build('index', {})
'/'
>>> urls.build('downloads/show', {'id': 42})
'/downloads/42'
>>> urls.build('downloads/show', {'id': 42}, force_external=True)
'http://example.com/downloads/42'
>>>
关于 Werkzeug 的路由系统 , 这里只是简单介绍 , 具体可以查看 Werkzeug 的文档 (http://werkzeug.pocoo.org/docs/latest/routing/) 及相关代码 。
在上一节 , 注册路由后 , 两个对应关系分别存储到 url_map 和 view_functions 中 , 前者存储了 URL 到端点的映射关系 , 后者则存储了端点和视图函数的映射关系 。 下面我们会了解在客户端发送请求时 , Flask 是如何根据请求的 URL 找到对应的视图函数的 。 在上一节分析 Flask 中的请求响应循环时 , 我们曾说过 , 请求的处理最终交给了 dispatch_request() 方法 , 这个方法如代码清单所示 :
[flask.py]
class Flask(object):
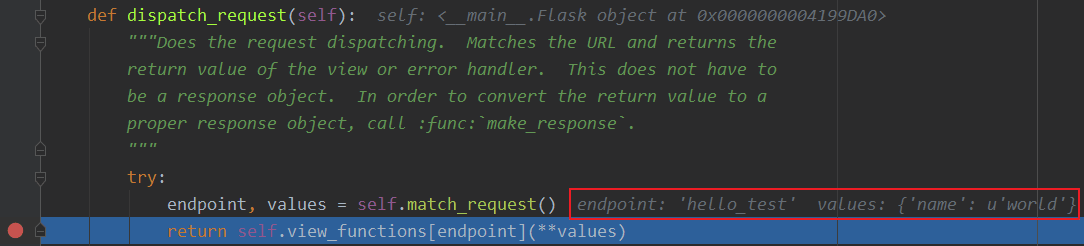
def dispatch_request(self):
try:
endpoint, values = self.match_request()
return self.view_functions[endpoint](**values)
except HTTPException, e:
handler = self.error_handlers.get(e.code)
if handler is None:
return e
return handler(e)
except Exception, e:
handler = self.error_handlers.get(500)
if self.debug or handler is None:
raise
return handler(e)
从名字可以看出来 , 这个方法负责请求调度 (request dispatching) 。 正是 dispatch_request() 方法实现了从请求的 URL 找到端点 , 再从端点找到对应的视图函数并调用的过程 。 view_functions 在注册路由时 , 由 Rule 类表示的 rule 对象由 route() 装饰器传入的参数创建 。 如上文中的描述 : view_function 是 Flask 类中定义的一个字典 , 它存储了端点和视图函数的映射关系 。
而这里先调用 match_request() 方法得到处理的 endpoint 和 values , 如下最简单的示例代码 , 如果我请求的是 http://localhost:5000/hello/world/test , 则结果为 : endpoint='hello_test' , values={'name':'world'} , 调试信息如下图 :
[直接在flask.py文件中添加代码测试]

app = Flask(__name__)


@app.route('/hello/<name>/test', methods=['POST', 'GET'])
def hello_test(name):
    if name == "Test":
        return 'Test'
    else:
        return 'hello'


@app.route('/hello/<name>', methods=['POST', 'GET'])
def hello(name):
    if name == "Test":
        return 'Test'
    else:
        return 'hello'


@app.route('/')
def index():
    return "This is index page"


if __name__ == '__main__':
    app.run()
如果我请求的是 http://localhost:5000/hello/world , 则结果为 : endpoint='hello' , values={'name':'world'} , 调试信息如下图 :

由此可见 endpoint 就是视图函数的名称 , values 则是注册路由时 , 路径的可变参数的名称与值组成的字典 。
那么我们来仔细看一下 view_functions 对象 , view_functions 在 Flask 对象初始化的时候是空字典 :
class Flask(object):

    def __init__(self, package_name):
        ...
        self.view_functions = {}
        ...
第一次出现变化的是在添加路由的时候 , 即在 Flask.route() 函数内部出现了首次变化 。
[flask.py]

class Flask(object):

    def route(self, rule, **options):
        def decorator(f):
            self.add_url_rule(rule, f.__name__, **options)
            self.view_functions[f.__name__] = f
            return f
        return decorator
将试图函数装饰一下 , 把视图函数本身对象复制给以视图函数名为 key , 形式如下 :
{'func_name': func(Object)}
因此在 dispatch_request 函数最后一行 return self.view_functions[endpoint](**values) 中 , self.view_functions[endpoint] 代表的是视图函数对象本身 , 后面的 (**values) 可以表示为 endpoint_obj(name=value) , 即是执行视图函数 。
虽然已经通过调试知道 match_request 函数的执行结果 , 但还需要通过源码理解一番 。
[flask.py]

class Flask(object):

    def match_request(self):
        rv = _request_ctx_stack.top.url_adapter.match()
        request.endpoint, request.view_args = rv
        return rv
通过上面的代码可以看到 , 最终是调用了请求的 match() 方法来获取到 endpoint 和参数 , 而调用者 url_adapter = url_map.bind_to_environ(environ) , 在 _RequestContext 类的初始化函数中可以看到 :
class _RequestContext(object):

    def __init__(self, app, environ):
        self.app = app
        self.url_adapter = app.url_map.bind_to_environ(environ)
        self.request = app.request_class(environ)
        self.session = app.open_session(self.request)
        self.g = _RequestGlobals()
        self.flashes = None
self.url_adapter = app.url_map.bind_to_environ(environ) , 也就是说实际获取 endpoint 与参数是通过调用 url_map.bind_to_environ(environ).match() 来获取的 。 通过前面的介绍我们已经知道 , url_map 中存储的是 url 与 endpoint 之间的映射关系 , 这种映射关系是通过 @app.route() 进行指定的 。 而 environ 为单次请求信息 , 内部包含请求的 url 。 可以理解为存储信息的对象 url_map 绑定特定的请求信息 environ , 然后进行匹配 match() , 即可得到请求对应的 endpoint 和参数 value 。 也因此说明 match_request 在本地上下文中使用 , 每次请求 url 创建请求上下午对象时都会执行该函数 。
可以看到 endpoint 和 view_args 属性就在这个方法中创建 。 这个方法调用了 _request_ctx_stack.top.url_adapter.match() 来获取 endpoint 和 view_args 。 这里的 url_adapter 属性在 _RequestContext 的构造函数中定义 , 其值为 app.url_map.bind_to_environ(environ)
[flask.py]

class _RequestContext(object):
    """The request context contains all request relevant information.  It is
    created at the beginning of the request and pushed to the
    `_request_ctx_stack` and removed at the end of it.  It will create the
    URL adapter and request object for the WSGI environment provided.
    """

    def __init__(self, app, environ):
        self.app = app
        self.url_adapter = app.url_map.bind_to_environ(environ)
        self.request = app.request_class(environ)
        self.session = app.open_session(self.request)
        self.g = _RequestGlobals()
        self.flashes = None

    def __enter__(self):
        _request_ctx_stack.push(self)

    def __exit__(self, exc_type, exc_value, tb):
        # do not pop the request stack if we are in debug mode and an
        # exception happened.  This will allow the debugger to still
        # access the request object in the interactive shell.
        if tb is None or not self.app.debug:
            _request_ctx_stack.pop()
我们知道 url_map 属性是一个 Map 对象 , 可以看出它最后调用了 bind() 或 bind_to_environ() 方法 , 最终会返回一个 MapAdapter 类实例 。
match_request() 方法通过调用 MapAdapter.match() 方法来匹配请求 URL , 返回结果包含 endpoint 属性 , 存储着匹配成功的端点值 。
在 dispatch_request() 最后这一行代码中,通过在 view_functions 字典中根据端点作为键即可找到对应的视图函数对象 , 并调用它 :
return self.view_functions[endpoint](**values)
调用视图函数时传递的参数 **values 包含 URL 中解析出的变量值 , 也就是 match() 函数返回的第二个值 。 这时代码执行流程才终于走到视图函数中 。
2.3.3 本地上下文
Flask 提供了两种上下文 , 请求上下文和程序上下文 , 这两种上下文分别包含 request 、 session 和 current_app 、 g 这四个变量 , 这些变量是实际对象的本地代理 (local proxy) , 因此被称为本地上下文 (context locals) 。 这些代理对象定义在脚本中 。
获取当前请求的信息是从 _request_ctx_stack.top 中获取出来的 , 也就是说请求会被加入请求栈中 , 栈顶的就是当前请求 。 可以看一下这个请求栈 _request_ctx_stack 的定义 :
_request_ctx_stack = LocalStack()
current_app = LocalProxy(lambda: _request_ctx_stack.top.app)
request = LocalProxy(lambda: _request_ctx_stack.top.request)
session = LocalProxy(lambda: _request_ctx_stack.top.session)
g = LocalProxy(lambda: _request_ctx_stack.top.g)
我们在程序中从 flask 包直接导入的 request 和 session 就是定义在这里的全局对象 , 这两个对象是对实际的 request 变量和 session 变量的代理 。
未完待续 ...
上一篇文章 : 上一篇
下一篇文章 : 下一篇